Vertical Blinds
How to install Vertical blinds
Vertical blind installation instructions
Please note – illustrations and diagrams provided are not to scale and are for visual reference only.
Fixing parts included (per blind)

Before you start…
Check all the above fixing parts have been supplied. In the event of a missing part (or parts) contact us for support. The number of fixing parts will vary in relation to the size and number of blinds supplied. Please ensure the blind is mounted using a spirit level for correct operation. The following tools and instruments will be required to complete installation safely and accurately:
- Power drill
- Phillips head screwdriver
- Pencil & tape measure
- Spirit level
- Small step ladder (if required)
- Protective eyewear & gloves (if drilling into masonry, metal or tile)
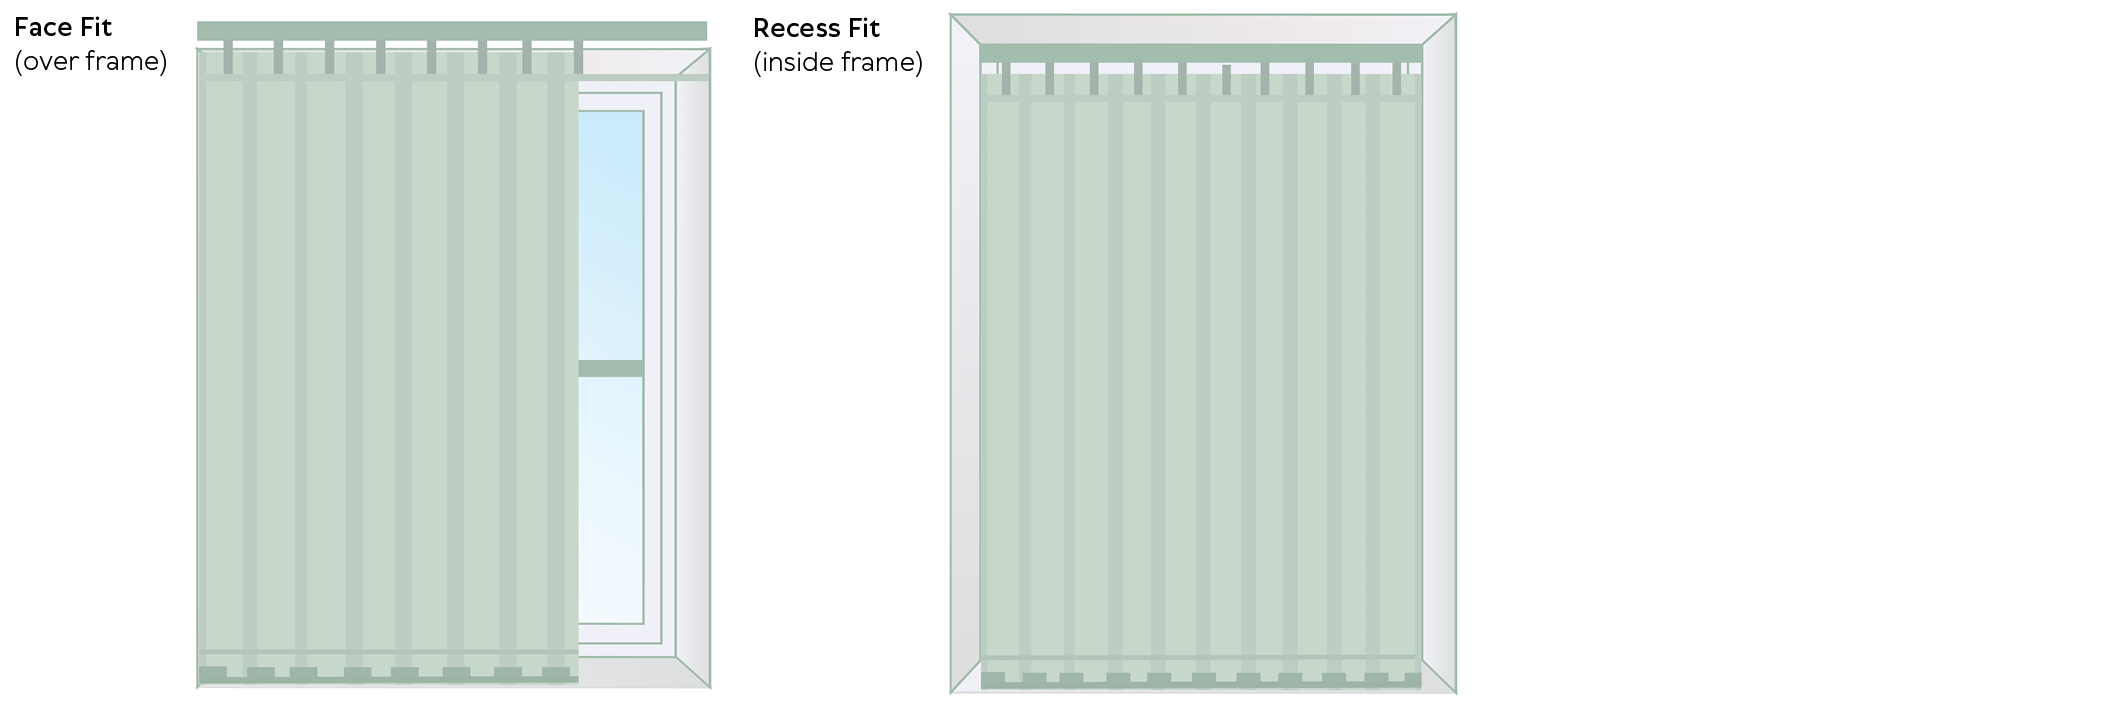
Fitting location
Before commencing installation, determine the correct fitting location for your window. The location should correspond with your order information for face or recess (top) fix. Please note, your finished size for a Face Fit blind is as per the ordered size. For a Recess Fit blind, the supplied width will be 10mm less than ordered and the drop will be 20mm less than ordered. This is to allow the brackets to fit inside the recess.
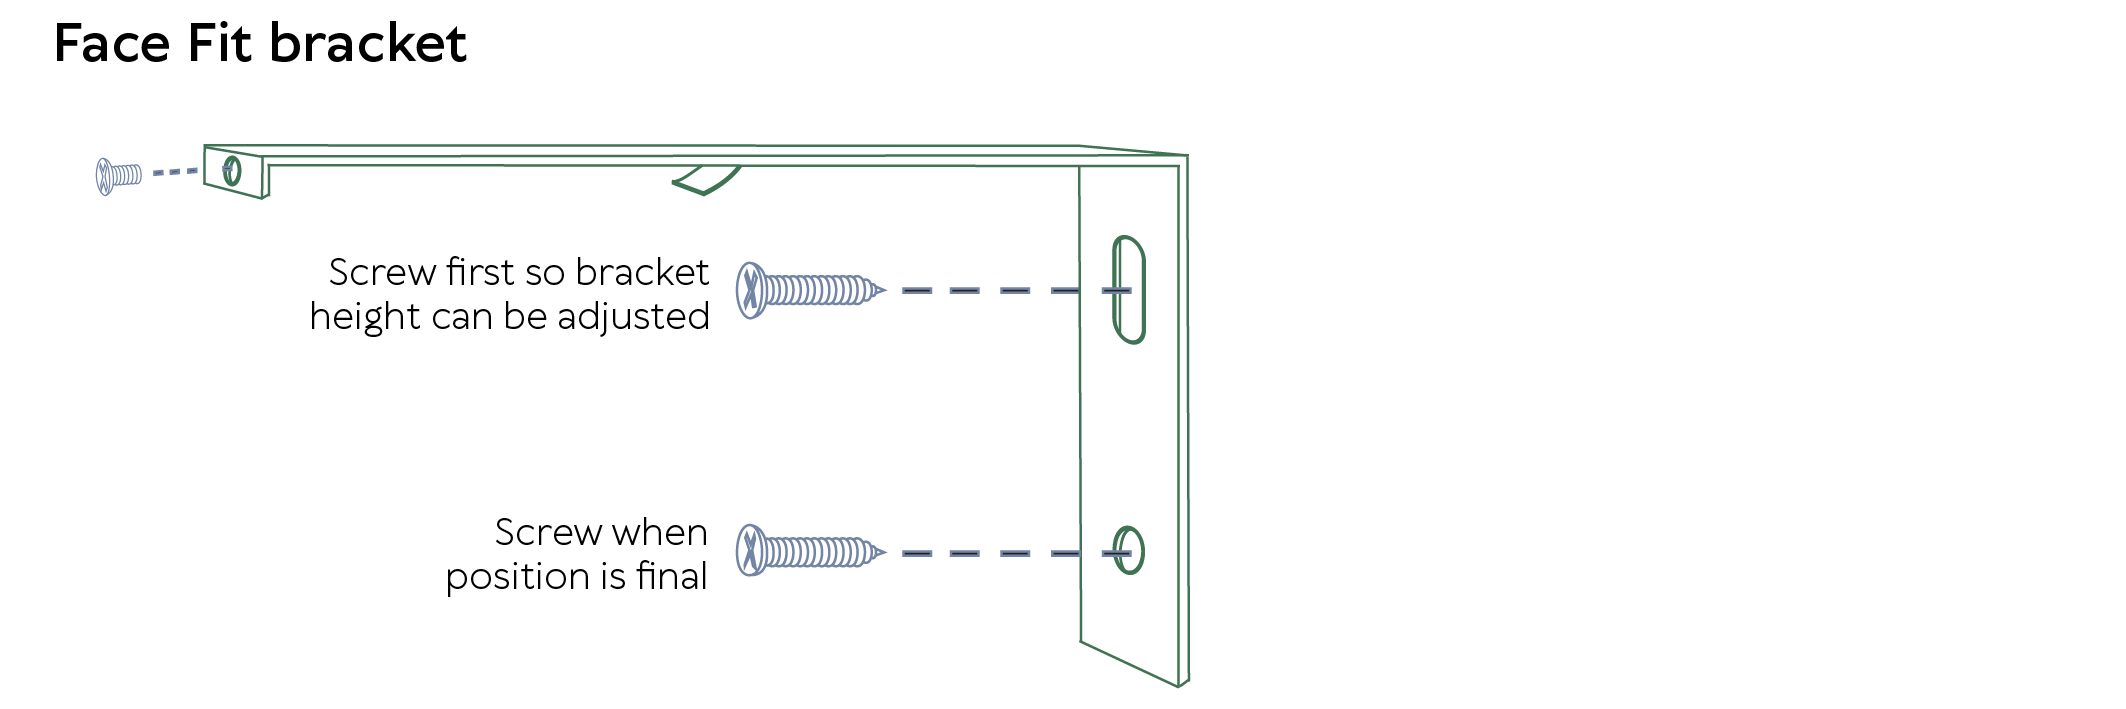
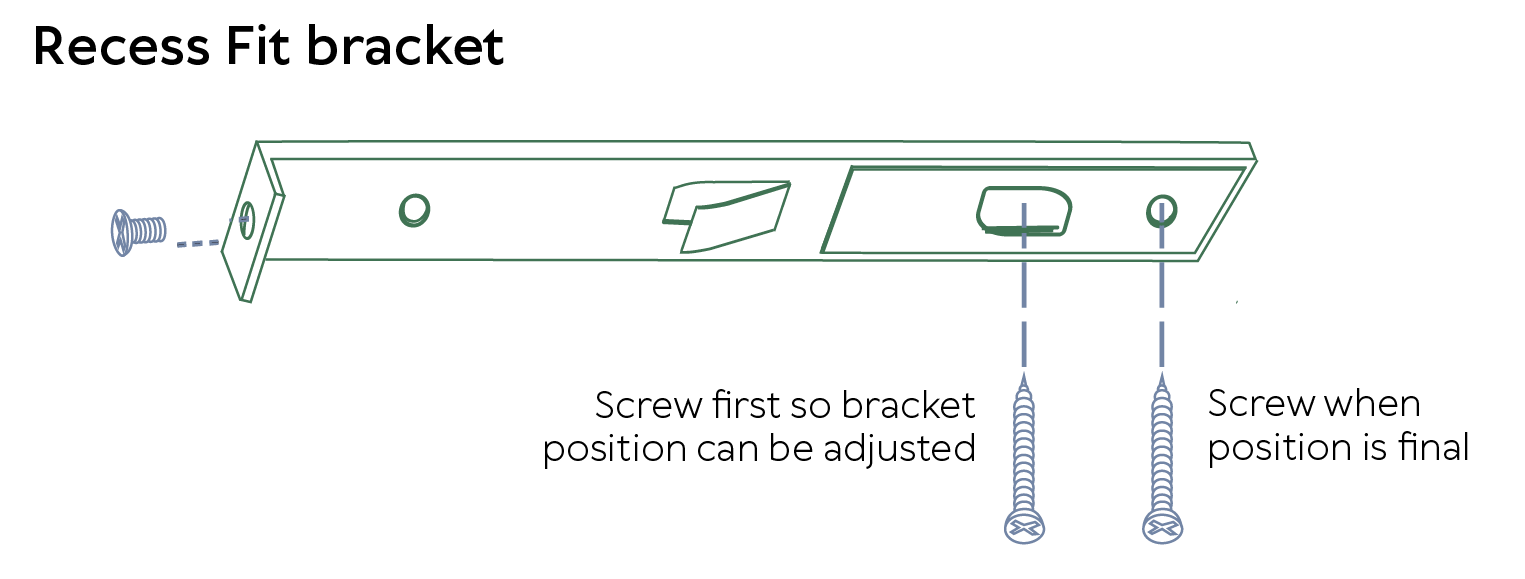
Step 1 – Installing the mounting brackets
Face Fit: attach the first mounting bracket directly over the top right (or left) corner of the window or architrave. Install the remaining mounting bracket(s) a maximum distance of 750mm from the previous bracket. Adjust the position of the bracket so that the louvres clear all obstructions.
Recess Fit: attach the first mounting bracket directly into ceiling or the uppermost section of window frame or architrave on the left or right side of the window. The centre of the mounting bracket equals the centre of the louvre hook. Position the screw a minimum of 55mm in front of the window frame or any projection.Install the remaining mounting bracket(s) a maximum distance of 750mm from the previous bracket. Allow a minimum of 12mm clearance above the window sill or floor.
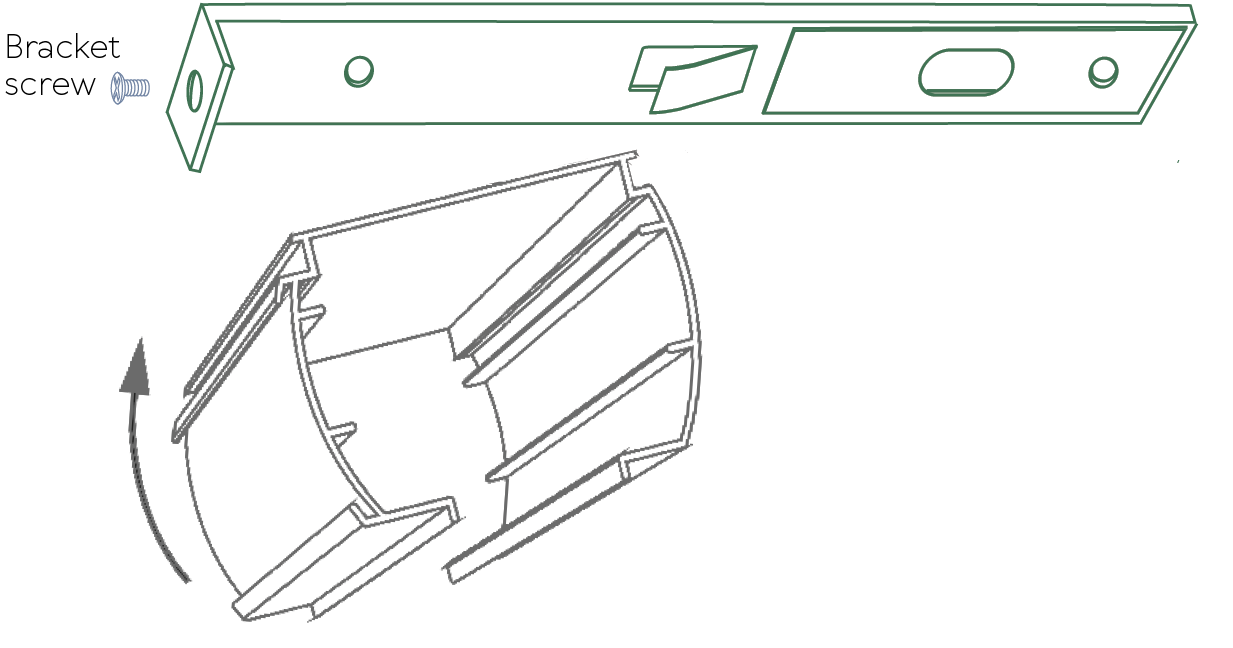
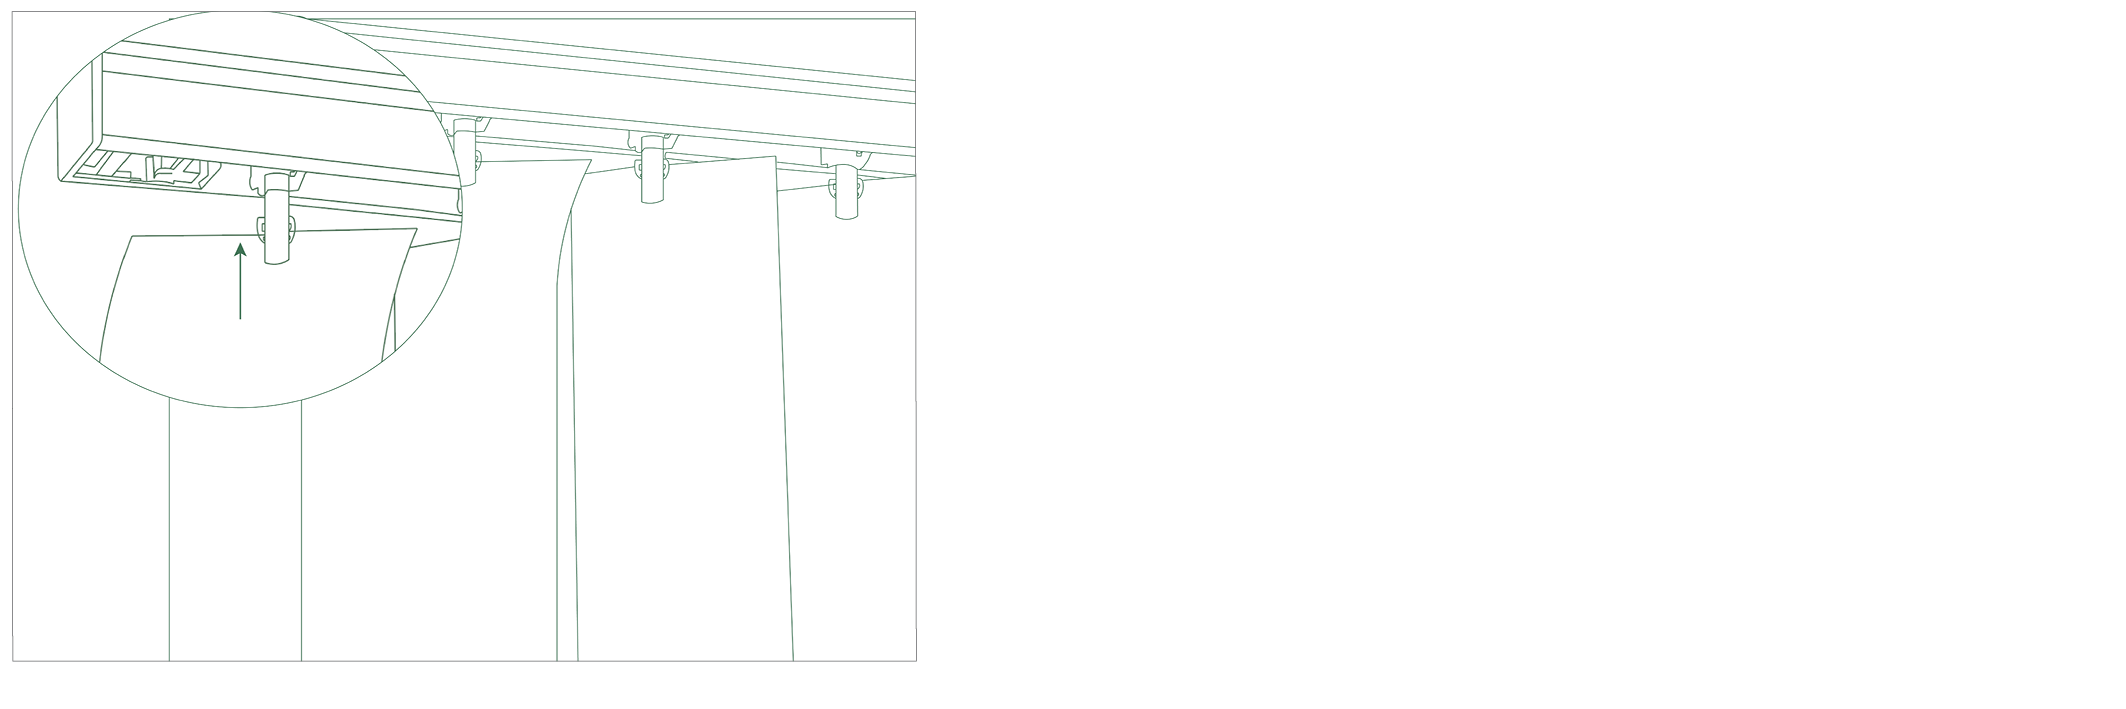
Step 2 – Attaching the blind track
Place the rear of the blind track into the mounting bracket’s pin and level the track to the bracket. Then tighten the bracket screw to lock the track in place. Re-insert the fabric insert (if required).
Step 3 – Connecting the fabric panels to the blind track
Push the louvre up into the carrier stem. Then pull slightly straight down to lock in place. For wand options, if the louvres are curved, the curved side should face the wand.
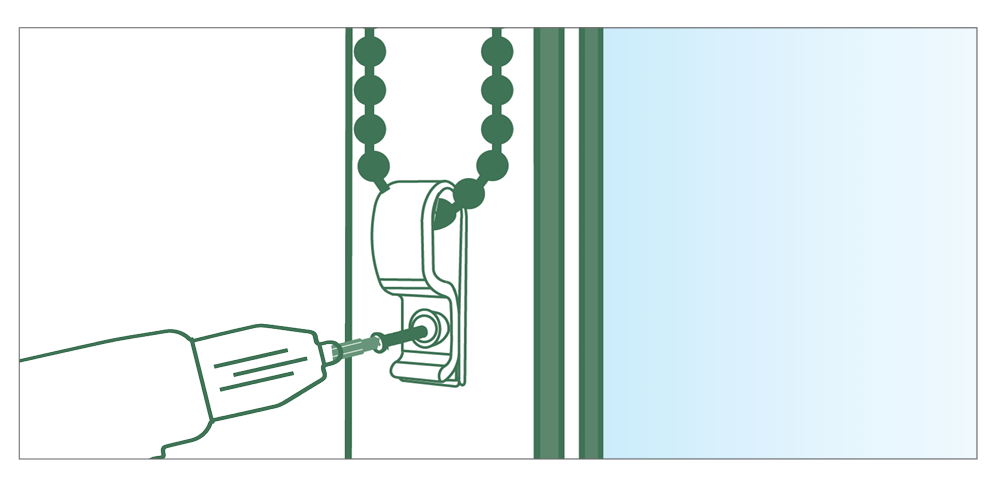
Step 4 – Installing the child safety device
Position the child safety device at the bottom of the chain loop drop and screw it into the mounting surface (Front or Recess as relevant), making sure that the looped chain hangs with minimal tension.
Please read the Important Safety Information before using your blind.
Operating your blind
Wand Control
To rotate the louvres, rotate the end in the direction you want the louvres rotated. To traverse the louvres, rotate the louvres to the open position. Then, push or pull the wand to open (stack louvres) or close (unstack louvres) the blind.
Cord Lock Control
To rotate the louvres, gently pull the chain. To traverse the louvres, gently pull the nylon cord.
Please note, for proper louvre traversing it is critical that the louvres be rotated to the open position prior to pulling on the cord (to draw the louvres across the window opening). If louvres become tangled or have moved out of alignment, re-adjust as follows:
- With your hand, gently adjust the louvres so they are all facing the same direction. Make certain that the louvres overlap each other in the correct direction.
- Pull the metal bead chain until you hear a grinding sound. Give the chain an additional gentle pull. This grinding noise comes from the louvre carriers realigning themselves.
- Now pull the chain in the opposite direction and all vanes will be aligned correctly.
Important Safety Information
Blind and curtain cords are a significant risk to children as unsecured cords (or chains) can lead to strangulation.
The Australian Competition and Consumer (Corded Internal Window Coverings) Safety Standard states that a corded internal window covering ‘must be installed in a way that a loose cord cannot form a loop 220mm or longer and at less than 1600mm above floor level’. To achieve this, follow the below advice:
- Check there are no loose operational chains or cords that children can reach from the floor, cot/bed, or by climbing on nearby furniture.
- If you install an operational child safety device lower than 1600mm above floor level, you must ensure that children cannot remove the chain from the device and that the chain is sufficiently secured or tensioned to prevent a loop of 220mm or longer from being formed
- The child safety device must be installed using the provided screw.
- When installing into plasterboard, the device must be attached to the studs behind the plasterboard using the self-tapping screw provided and mounted at a height of at least 1600mm from the floor.
- For masonry walls, pre-drill small holes the size of the appropriate screw anchors at the marked location. Insert the anchors at the holes and then fix the device with the provided screws.
For more information, visit www.productsafety.gov.au